Say hello to "Amber"
After waiting a week to let the body totally cure off today was guitar assembly and set up time!!! And here is the final result... I've christened her "Amber" after the colour used on the body.

Let me take you through the assembly...
Here was thework shop dining room table as I was preparing to start about 9am Saturday morning.

First job was soldering all the various components together on the body. I didn't fix anything down at this point in case there were any hassles.

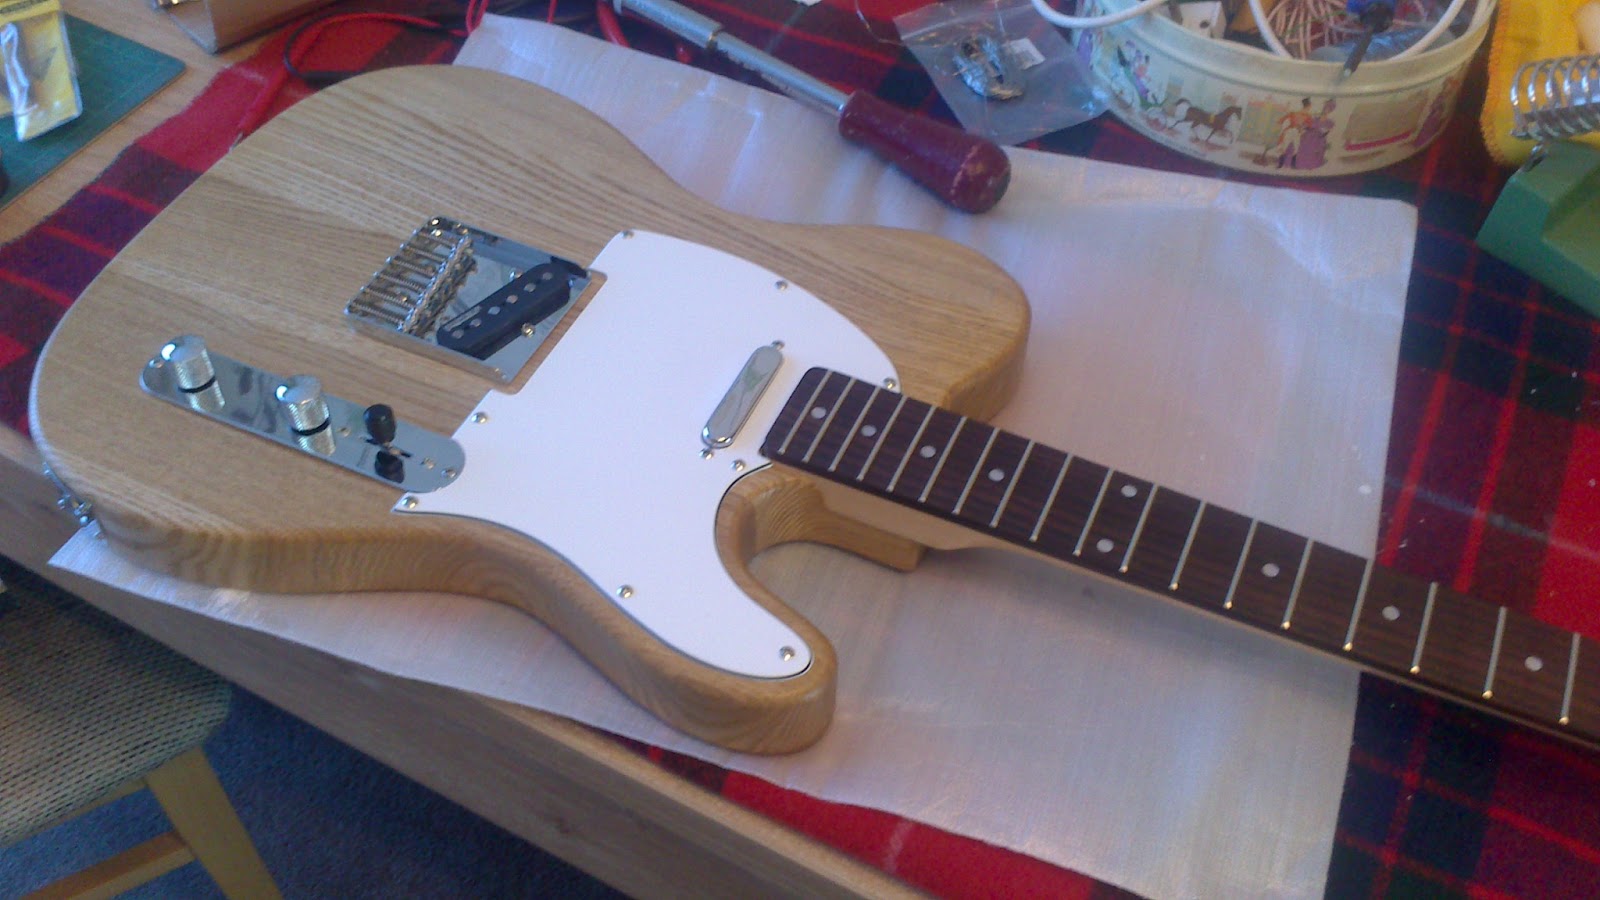
I soldered on the jacksocket - so I could then do a "tap test" (tapping a screwdriver on the pickups whilst the guitar is plugged into an amp to ensure the electrics are generally ok) Then I attached everything to the body. I drilled necessary holes for the scratchplate and control plate and screwed them, the bridge and the jack socket into position.

Then to the final major bit. Attaching the neck. This neck/body combination had been "mated" by the kit supplier so that was easy just align the neck and fasten the four screws, with a little candle wax to help lubricate them.

Having now got the neck fixed it finally really does look and feel like a proper guitar.

On with stringing and setting it up. Sorry I was so "in the zone" concentrating I didn't take any photos but essentially, set the neck relief, I went for about .012" at the 8th fret measured with a capo on 1st fret and fretting at the 21st with the other hand measured on the bass side 6th string. Then to the nut which was not surprisingly pre-cut a little too high. I have some nut files, an extravagent expense I know but Mrs F bought them as a present a few years ago and frankly if you have the money they are worth it, nut work can be a worry since if you make a mistake you really can't correct it only replace the nut and start again! I gently lowered each slot to about .008" measured on first fret whilst freting at the 3rd. Although to be honest more of this was by eye, i.e. just slowly working down until I was ok with it. Then set the action, about 4/64" at the 17th fret on both sides. Finally I set the intonation. All done a bit of a play and then recheck everything it feels pretty nice to play and is as "in tune" as any guitar is likely to ever be across the board. This picture is just before the intonation setting as the saddles are as the bridge arrived.

And so all finished just in time for 3pm cup of tea! I've plugged her in and ... sounds like a T'caster should I'd say. Overall really, really pleased and proud with the result. I went for a kit with an Ash body as I wanted a natural finish and like Ash for that and the colour has ended pretty much bang on for what I wanted. Actually if someone had shown me this picture at the start I'd have said "Yes that is what I want something just like that". I might do an audio/video demo some time soon so stay tuned for that.

Special thanks to DIY Guitar Shop who supplied the kit, Wudtone for the Amber finish, Vanson Guitars for the pickups, scratchplate, strap locks and other bits, CH Guitars and Stewmac for tools and my little local ironmongers Johnson's of Rainham where I should shop more often than going to the big DIY chain along the road, they supplied the Danish Oil, Wirewool and other sundries!

Let me take you through the assembly...
Here was the

First job was soldering all the various components together on the body. I didn't fix anything down at this point in case there were any hassles.

I soldered on the jacksocket - so I could then do a "tap test" (tapping a screwdriver on the pickups whilst the guitar is plugged into an amp to ensure the electrics are generally ok) Then I attached everything to the body. I drilled necessary holes for the scratchplate and control plate and screwed them, the bridge and the jack socket into position.

Then to the final major bit. Attaching the neck. This neck/body combination had been "mated" by the kit supplier so that was easy just align the neck and fasten the four screws, with a little candle wax to help lubricate them.

Having now got the neck fixed it finally really does look and feel like a proper guitar.
On with stringing and setting it up. Sorry I was so "in the zone" concentrating I didn't take any photos but essentially, set the neck relief, I went for about .012" at the 8th fret measured with a capo on 1st fret and fretting at the 21st with the other hand measured on the bass side 6th string. Then to the nut which was not surprisingly pre-cut a little too high. I have some nut files, an extravagent expense I know but Mrs F bought them as a present a few years ago and frankly if you have the money they are worth it, nut work can be a worry since if you make a mistake you really can't correct it only replace the nut and start again! I gently lowered each slot to about .008" measured on first fret whilst freting at the 3rd. Although to be honest more of this was by eye, i.e. just slowly working down until I was ok with it. Then set the action, about 4/64" at the 17th fret on both sides. Finally I set the intonation. All done a bit of a play and then recheck everything it feels pretty nice to play and is as "in tune" as any guitar is likely to ever be across the board. This picture is just before the intonation setting as the saddles are as the bridge arrived.

And so all finished just in time for 3pm cup of tea! I've plugged her in and ... sounds like a T'caster should I'd say. Overall really, really pleased and proud with the result. I went for a kit with an Ash body as I wanted a natural finish and like Ash for that and the colour has ended pretty much bang on for what I wanted. Actually if someone had shown me this picture at the start I'd have said "Yes that is what I want something just like that". I might do an audio/video demo some time soon so stay tuned for that.

Special thanks to DIY Guitar Shop who supplied the kit, Wudtone for the Amber finish, Vanson Guitars for the pickups, scratchplate, strap locks and other bits, CH Guitars and Stewmac for tools and my little local ironmongers Johnson's of Rainham where I should shop more often than going to the big DIY chain along the road, they supplied the Danish Oil, Wirewool and other sundries!


She's gorgeous. I can't wait to hear you make her "sing".
ReplyDeleteWonderful work well done!
ReplyDeleteHappy birthday, Amber.
ReplyDeleteHello to Amber.
ReplyDeleteShe is lovely! Thank you for sharing this process - almost make it appear to be a simple process, but i've been fooled into thinking i have far greater skills by the old Ikea instructions - i don't think i'd try one of these. Suspect you have more skills than the average DIY-er. Would love to hear how she plays!
ReplyDeleteFunny I wouldn't say my skills are that good on DIY. However self assembly stuff a la Ikea never phases me. I suppose it is what you benchmark against. My Dad was a shipwright and could make anything from scratch, frankly honestly he could easily make a guitar starting with a log! So I compare myself to that I suppose and therefore don't rate myself that highly, but I suppose if I can do this then I must be half competent.
DeleteI live in the land of guitarists (husband and sons) even though all I play is the radio. But I do know a stunning guitar when I see one.
ReplyDeleteCongratulations!
Sherry
Beautiful! And well done on your application. My hubby got a DIY guitar kit about fifteen years ago, and it was only last winter that he gave in and put the component bits - never more than part-assembled - on the fire. It was the only way that poor guitar was ever going to give off any sparks.
ReplyDeleteNo!!! Travesty!
DeleteI KNOW!! Not one of his finer moments...
ReplyDeleteDidn't read it - too boring! - but the finished product looks beautiful. Hope it sounds as good.
ReplyDeleteYou should have signed it somewhere before you applied the finish! You know...now that you're a custom luthier...
ReplyDeleteI think "custom luthier" is pushing it a bit frankly :-) I've been careful to say I've "built" a guitar not "made" :-)
DeleteI'm very impressed--it (she? are guitars, like ships, always female?) looks lovely and your involvement in the process of her manufacture was fascinating to read, with the bits of esoteric knowledge about the depth of hte action and so on. A sound file next please!
ReplyDeleteOhhhh she's pretty. I have a friend who builds guitars and I have to love a beautiful one.
ReplyDeleteHats off to you, my dear sir! Is there anything you can't do? Wow!
ReplyDeletewow..I am impressed¬!!!
ReplyDeletexx
Top job, mate - very nice.
ReplyDeleteAmber looks and sounds like a very hot kinda gal :))), enjoy playing...her.
ReplyDelete